Quick Start Guide
This section will guide you through the basic setup required to begin using Asset Management. Simply follow these step-by-step instructions and youll have Asset Management configured in no time. The steps listed here are intended to be brief.
Step One: Log in as a System Administrator. Youll need administrative rights to configure Asset Management.
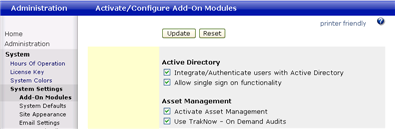
Step Two: Activate the Asset Management module. Choose Administration, System, System Settings, Add-On Modules. Place a check in the Activate Asset Management checkbox and click the Update button. There should now be an Asset Management menu option on the Main menu. If you also wish to utilize TrakNow functionality, place a check in the Use TrakNow - On Demand Audits checkbox. For more information on TrakNow, please see below.
Step Three: Establish a list of Asset Types. Asset Types are used to determine an item classification. When you install Asset Management, the Asset Type of PC has been designated as the default asset type. Choose Asset Management, Asset Tables, Asset Types and enter other Asset Type if desired. For each type, you may specify whether you want it to include PC-related fields by clicking on the Include PC Fields checkbox. Optional Fields: If there is additional data you would like to retain for a certain Asset Type that is not already provided in the item record, you can utilize one or more of the optional fields. You can create any number of user-defined text fields and/or list fields to further define each Asset Type.
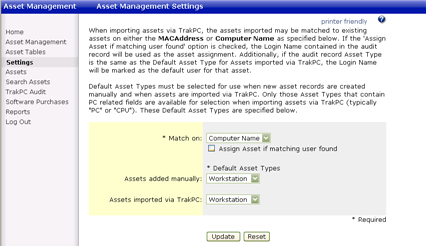
Step Four: Determine Asset Management Settings. Asset Management Settings establish default values to be used under certain circumstances within the Asset Management module. When audit records come in, they reside in a separate audit table. There is a procedure to apply the audit records to the asset item records. If an asset item record does not exist, one will be created. If an asset item record does exist, then it will be updated with the audit information.
Match On: Asset Management can use either the NIC MAC address or the Windows Computer Name to match audit records to asset item records. Select the matching method you prefer.
Assign Asset if matching user found: If selected, the system will automatically associate an asset to a particular user if the IssueTrak User ID is the same as the Login Name returned in an audit.
Default Type: Default Asset Types can be specified when manually adding new Assets as well as when assets are imported via TrakPC.
Step Five: Consider who will have access to Asset Management information. There are two user attributes related to Asset Management. These attributes control whether users can view asset item records or whether users can manage and maintain asset item information. You will assign these attributes in Administration under Edit User.
Can view and select from Assets when submitting and maintaining issues--Allows users read-only access to all asset item information
Can access and maintain Asset Management Module functions--Allows users to administrate asset item information. These users will have permission to view, create, maintain and delete Asset Management information.
Congratulations! You have completed the steps and entered the basic information required to activate and begin using Asset Management.
Youll want to establish values for your Lookup Tables before you actually begin to enter item records. The next sections will guide you through this process.